Placing Text
Build the game screen for Hot and Cold using PRINT AT and position coordinates.
Over the next eight units you’ll build Hot and Cold — a treasure hunt on a grid. A treasure is hidden somewhere on screen, invisible. You move a cursor with the keyboard and the Spectrum tells you how close you are — not with numbers, but with colour. The border turns blue when you’re far away, red when you’re getting warm, yellow when you’re burning hot. Find all five treasures in the fewest moves you can.
The big new idea in this game isn’t any single command — it’s using coordinates to track a position that moves. You’ll store the cursor’s location in variables, update those variables on each keypress, and redraw the screen. That read-update-draw cycle is the game loop, and it’s the pattern behind every game from here on.
The Screen Grid
You’ve used PRINT AT since Game 2 to place text at specific positions. Now you’ll use it for something more demanding: drawing a cursor that the player can move around the entire screen.
The screen is a grid: 24 rows (0-23) and 32 columns (0-31). Row 0 is the top, column 0 is the left edge. Think of it as graph paper — every character sits in a specific cell.
  10 CLS
  20 PRINT AT 0,0;"Top left"
  30 PRINT AT 0,24;"Top right"
  40 PRINT AT 11,12;"Centre"
  50 PRINT AT 21,0;"Bottom left"
PRINT AT row, col moves the cursor to that position before printing. The row comes first, then the column, separated by a comma. A semicolon follows the column number before the text.
Coordinates to Remember
| Position | Row | Column |
|---|---|---|
| Top-left | 0 | 0 |
| Top-right | 0 | 24 |
| Centre | 11 | 12 |
| Bottom-left | 21 | 0 |
Rows 22-23 are reserved for system messages. Stick to rows 0-21 for your own text.
The Game Screen
Hot and Cold needs a header bar, instructions, and a status line. PRINT AT lets you place each piece exactly where it belongs.
   5 BORDER 0: PAPER 0: INK 7: CLS
  12 FOR i=0 TO 31
  14 PRINT AT 0,i; PAPER 3;" "
  16 NEXT i
  18 PRINT AT 0,10; PAPER 3; INK 7; BRIGHT 1;" HOT AND COLD "
  28 PRINT AT 21,0; INK 5;"Round 1  Moves: 0"
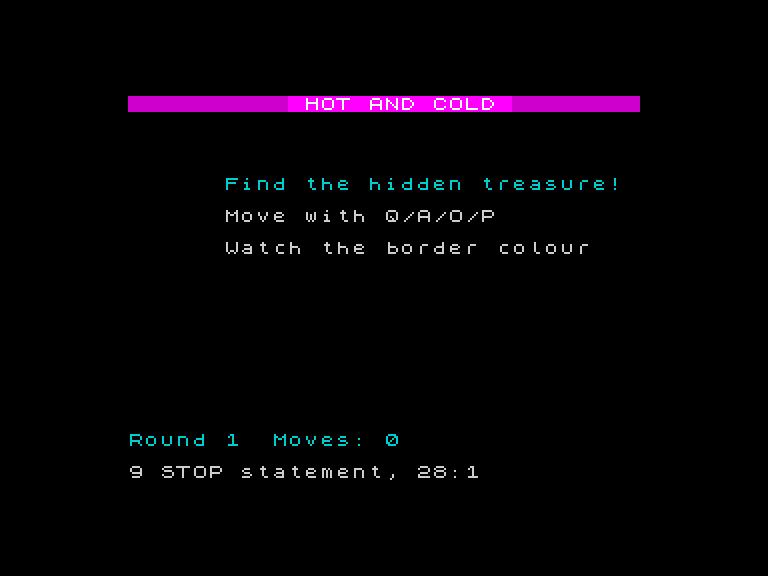
A magenta header bar stretches across the top with “HOT AND COLD” in bright white. Instructions sit in the centre of an otherwise black screen. A status line at row 21 shows the round number and move count. The screen looks purposeful — each piece of text placed exactly where it belongs.
Here’s how it works:
- Line 5 sets the stage: black border, black paper, white ink, clear screen. Four commands on one line.
- Lines 12-16 — a FOR loop fills row 0 with magenta spaces, creating the header bar.
- Line 18 — prints the title on top of the bar in bright white.
- Line 28 — places the status line at row 21. Everything sits at a precise position because
PRINT ATputs it there.
Centring Text
To centre text on a row, calculate the starting column: (32 - length) / 2. The title “HOT AND COLD” is 12 characters, plus two spaces of padding makes 14, so it starts at column (32 - 14) / 2 = 9. Close enough to 10 — exact centring isn’t critical, but it looks better than guessing.
Try This
Add more instructions. Put “Watch the border colour” on a third line below the existing instructions. Pick a row that leaves even spacing.
Change the header colour. Replace PAPER 3 (magenta) with PAPER 1 (blue) or PAPER 2 (red). See which looks best against the black background.
What You’ve Learnt
- PRINT AT row, col — familiar from Game 2, now used to build a full game screen
- The grid — 24 rows (0-23) by 32 columns (0-31), with rows 0-21 as the safe area
- Row first, column second — always
PRINT AT row, col - Header bars — a
FORloop filling a row with coloured spaces creates a solid bar