Ship on Screen
Put a hardware sprite on screen with the VIC-II — the first piece of your first C64 game, built from a blank screen up.
A white spaceship against black. Nothing moves, nothing makes sound — it just sits there. That's the goal of this unit, and it's the first piece of your first C64 game.
In the Primer you met the VIC-II through its border and background colours, wrote bytes straight into screen memory, and launched machine code with a SYS stub. This unit uses all of that — LDA/STA, memory-mapped registers, the 10 SYS 2061 stub — and adds the one new thing a game needs: a hardware sprite, a movable graphic the VIC-II draws for you, on top of the screen, wherever you tell it.
We'll get there from a blank screen, in two steps.
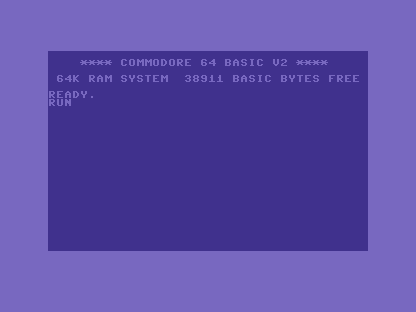
Where we start
A freshly booted C64, the way the Primer left it: the start-up message, and READY. Type RUN and our bare program does nothing yet — there's nothing on screen but BASIC.
Milestone 1 — a black canvas
Before the ship, we clear the stage: border and background to black, and the BASIC text wiped out of screen memory. This is the Primer's screen work — STA $d020/$d021 for the colours, a loop writing spaces across the 1,000 bytes of screen RAM at $0400.
| 9 | 9 | !byte $0c,$08,$0a,$00,$9e,$32,$30,$36,$31,$00,$00,$00 | |
| 10 | 10 | | |
| 11 | 11 | ; ------------------------------------------------ | |
| 12 | - | ; Program — nothing yet, just hand control to a do-nothing loop | |
| 12 | + | ; Program | |
| 13 | 13 | ; ------------------------------------------------ | |
| 14 | 14 | *= $080d | |
| 15 | + | ; Black screen | |
| 16 | + | lda #$00 | |
| 17 | + | sta $d020 ; Border colour | |
| 18 | + | sta $d021 ; Background colour | |
| 19 | + | | |
| 20 | + | ; Clear the screen (fill with spaces) | |
| 21 | + | ldx #$00 | |
| 22 | + | - lda #$20 | |
| 23 | + | sta $0400,x | |
| 24 | + | sta $0500,x | |
| 25 | + | sta $0600,x | |
| 26 | + | sta $0700,x | |
| 27 | + | inx | |
| 28 | + | bne - | |
| 29 | + | | |
| 15 | 30 | loop: | |
| 16 | 31 | jmp loop | |
| 17 | 32 | |
The complete step 1 program
; Starfield - Unit 1: Ship on Screen
; Cumulative steps: step-00 (bare program) -> step-01 (+ black screen) -> step-02 (+ the ship)
; Assemble: acme -f cbm -o <step>.prg <step>.asm

; ------------------------------------------------
; BASIC stub
; ------------------------------------------------
*= $0801
!byte $0c,$08,$0a,$00,$9e,$32,$30,$36,$31,$00,$00,$00

; ------------------------------------------------
; Program
; ------------------------------------------------
*= $080d
        ; Black screen
        lda #$00
        sta $d020           ; Border colour
        sta $d021           ; Background colour

        ; Clear the screen (fill with spaces)
        ldx #$00
-       lda #$20
        sta $0400,x
        sta $0500,x
        sta $0600,x
        sta $0700,x
        inx
        bne -

loop:
        jmp loop
The four STA writes set the two colours; the loop counts the X register from 0, writing a space ($20) into each page of screen memory until INX wraps it back to 0 and BNE stops looping. The result is a clean black canvas:

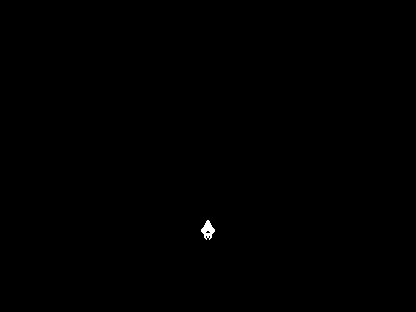
Milestone 2 — the ship
Now the new part. A hardware sprite needs four things from the VIC-II, plus its picture in memory.
| 26 | 26 | sta $0700,x | |
| 27 | 27 | inx | |
| 28 | 28 | bne - | |
| 29 | + | | |
| 30 | + | ; Sprite 0 setup (ship) | |
| 31 | + | lda #128 | |
| 32 | + | sta $07f8 ; Data pointer (block 128 = $2000) | |
| 33 | + | lda #172 | |
| 34 | + | sta $d000 ; X position | |
| 35 | + | lda #220 | |
| 36 | + | sta $d001 ; Y position | |
| 37 | + | lda #$01 | |
| 38 | + | sta $d027 ; Colour (white) | |
| 39 | + | lda #%00000001 | |
| 40 | + | sta $d015 ; Enable sprite 0 | |
| 29 | 41 | | |
| 30 | 42 | loop: | |
| 31 | 43 | jmp loop | |
| 44 | + | | |
| 45 | + | ; ------------------------------------------------ | |
| 46 | + | ; Sprite data at $2000 (block 128) | |
| 47 | + | ; ------------------------------------------------ | |
| 48 | + | *= $2000 | |
| 49 | + | !byte $00,$18,$00 ; ## | |
| 50 | + | !byte $00,$3c,$00 ; #### | |
| 51 | + | !byte $00,$3c,$00 ; #### | |
| 52 | + | !byte $00,$7e,$00 ; ###### | |
| 53 | + | !byte $00,$7e,$00 ; ###### | |
| 54 | + | !byte $00,$ff,$00 ; ######## | |
| 55 | + | !byte $00,$ff,$00 ; ######## | |
| 56 | + | !byte $01,$ff,$80 ; ########## | |
| 57 | + | !byte $03,$ff,$c0 ; ############ | |
| 58 | + | !byte $07,$ff,$e0 ; ############## | |
| 59 | + | !byte $07,$ff,$e0 ; ############## | |
| 60 | + | !byte $07,$e7,$e0 ; ###..####..### | |
| 61 | + | !byte $03,$c3,$c0 ; ##....##....## | |
| 62 | + | !byte $01,$ff,$80 ; ########## | |
| 63 | + | !byte $00,$ff,$00 ; ######## | |
| 64 | + | !byte $00,$ff,$00 ; ######## | |
| 65 | + | !byte $00,$db,$00 ; ##.##.## | |
| 66 | + | !byte $00,$db,$00 ; ##.##.## | |
| 67 | + | !byte $00,$66,$00 ; ##..## | |
| 68 | + | !byte $00,$24,$00 ; #..# | |
| 69 | + | !byte $00,$00,$00 ; | |
| 32 | 70 | |
The complete program
; Starfield - Unit 1: Ship on Screen
; Cumulative steps: step-00 (bare program) -> step-01 (+ black screen) -> step-02 (+ the ship)
; Assemble: acme -f cbm -o <step>.prg <step>.asm

; ------------------------------------------------
; BASIC stub
; ------------------------------------------------
*= $0801
!byte $0c,$08,$0a,$00,$9e,$32,$30,$36,$31,$00,$00,$00

; ------------------------------------------------
; Program
; ------------------------------------------------
*= $080d
        ; Black screen
        lda #$00
        sta $d020           ; Border colour
        sta $d021           ; Background colour

        ; Clear the screen (fill with spaces)
        ldx #$00
-       lda #$20
        sta $0400,x
        sta $0500,x
        sta $0600,x
        sta $0700,x
        inx
        bne -

        ; Sprite 0 setup (ship)
        lda #128
        sta $07f8           ; Data pointer (block 128 = $2000)
        lda #172
        sta $d000           ; X position
        lda #220
        sta $d001           ; Y position
        lda #$01
        sta $d027           ; Colour (white)
        lda #%00000001
        sta $d015           ; Enable sprite 0

loop:
        jmp loop

; ------------------------------------------------
; Sprite data at $2000 (block 128)
; ------------------------------------------------
*= $2000
        !byte $00,$18,$00   ;        ##
        !byte $00,$3c,$00   ;       ####
        !byte $00,$3c,$00   ;       ####
        !byte $00,$7e,$00   ;      ######
        !byte $00,$7e,$00   ;      ######
        !byte $00,$ff,$00   ;     ########
        !byte $00,$ff,$00   ;     ########
        !byte $01,$ff,$80   ;    ##########
        !byte $03,$ff,$c0   ;   ############
        !byte $07,$ff,$e0   ;  ##############
        !byte $07,$ff,$e0   ;  ##############
        !byte $07,$e7,$e0   ;  ###..####..###
        !byte $03,$c3,$c0   ;   ##....##....##
        !byte $01,$ff,$80   ;    ##########
        !byte $00,$ff,$00   ;     ########
        !byte $00,$ff,$00   ;     ########
        !byte $00,$db,$00   ;     ##.##.##
        !byte $00,$db,$00   ;     ##.##.##
        !byte $00,$66,$00   ;      ##..##
        !byte $00,$24,$00   ;       #..#
        !byte $00,$00,$00   ;
And there it is:
The four registers
- Where's the picture?
$07f8holds a block number — the sprite's data divided by 64. Block 128 means address$2000(128 × 64 = 8192 =$2000). - Where on screen?
$d000(X) and$d001(Y) place it. X runs left-to-right, Y top-to-bottom. - What colour?
$d027sets sprite 0's colour. White is 1. - Is it on?
$d015is the sprite-enable register — one bit per sprite. Set bit 0 to switch sprite 0 on.
The sprite's picture
A C64 sprite is 24 pixels wide and 21 tall. Each row is 3 bytes (24 bits), 63 bytes in all, padded to 64 — which is why sprite data sits on a 64-byte boundary. Each bit is one pixel: a 1 draws in the sprite's colour, a 0 is transparent. Bit 7 of the first byte is the top-left pixel.
Those bytes are the !byte rows at $2000 in the diff above. Here is everything together in memory:
When it's wrong, see why
A sprite that won't appear has a short list of causes, and they're all values you can check — re-read them in your code, and if your emulator has a monitor, watch them live. Run through them in order:
$d015— is bit 0 set?$00means every sprite is off, and you'll stare at a blank screen.$07f8— does the pointer match where the data is?128for data at$2000. A wrong pointer draws garbage or nothing.$d000/$d001— is the sprite on the visible screen? A Y of 0 or an X past the right edge hides it in the border.$d027— is the colour different from the background? A black sprite on black is there, just invisible.
Checking the actual values turns "nothing's showing" from a guessing game into a four-line checklist.
Before and after
We started at the machine's boot screen with nothing of ours on it, and finished with a sprite we placed and coloured ourselves — the first thing on screen that's truly yours.
Try this
- Change the colour. Swap the
$01written to$d027for any value 0–15:$02red,$03cyan,$05green,$07yellow,$0elight blue. Reassemble and the ship changes instantly. - Move the ship. Change the values written to
$d000(X) and$d001(Y). X only reaches 255, but the screen is 320 wide — reaching the right edge needs an extra register ($d010), which is exactly what Unit 3 is about. - Draw your own. Click pixels below; the bytes update as you draw. Paste them over the
!byterows.
What you've learnt
- Hardware sprites — the VIC-II draws a movable graphic for you, over the screen, wherever its registers say.
- The four sprite registers — data pointer (
$07f8), position ($d000/$d001), colour ($d027), and enable ($d015). - Sprite data format — 24 × 21 pixels, 3 bytes a row, on a 64-byte boundary; one bit per pixel.
- Debugging by register — a missing sprite is one of four registers being wrong, and you can read each one.
What's next
The ship sits still. In Unit 2 you'll wrap it in a game loop and read the joystick, so pushing the stick moves it around the screen.