Four Wires
Draw four coloured bars across the screen using PRINT AT with PAPER — each wire is two rows tall, labelled 1 to 4.
The game screen has a header bar and a score counter. Now it needs wires. Four coloured bars running across the lower half of the screen — blue, red, green, yellow — each labelled with a number. The player will cut one of these wires to defuse the bomb. First, they need to see them.
Drawing the Wires
Add these lines to the game screen from Unit 1:
   5 BORDER 0: PAPER 0: INK 7: CLS
  10 FOR i=0 TO 31
  12 PRINT AT 0,i; PAPER 2;" "
  14 NEXT i
  16 PRINT AT 0,8; PAPER 2; INK 7; BRIGHT 1;" BOMB DEFUSAL "
  20 FOR i=0 TO 1
  22 PRINT AT 13+i,5; PAPER 1;"            "
  24 PRINT AT 15+i,5; PAPER 2;"            "
  26 PRINT AT 17+i,5; PAPER 4;"            "
  28 PRINT AT 19+i,5; PAPER 6;"            "
  30 NEXT i
  32 PRINT AT 13,2; INK 1; BRIGHT 1;"1"
  34 PRINT AT 15,2; INK 2; BRIGHT 1;"2"
  36 PRINT AT 17,2; INK 4; BRIGHT 1;"3"
  38 PRINT AT 19,2; INK 6; BRIGHT 1;"4"
Type RUN.
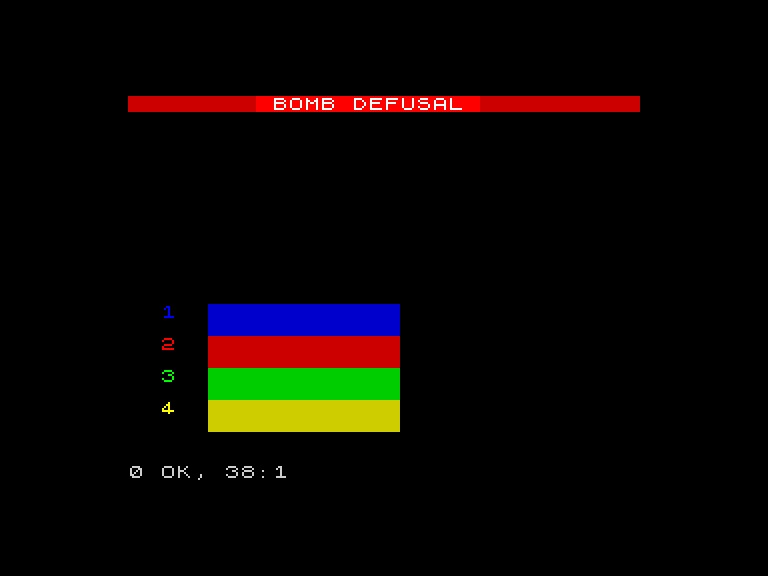
Four thick coloured bars stretch across the screen. Blue at the top, red below it, green below that, yellow at the bottom. Each wire is two rows tall. Numbers 1-4 sit to the left of each wire in matching bright colours.
The FOR loop on lines 20-30 runs twice (i=0 and i=1), drawing both rows of each wire. Line 22 prints twelve spaces with PAPER 1 (blue) at rows 13 and 14. Line 24 does the same with PAPER 2 (red) at rows 15 and 16. Lines 26 and 28 draw the green and yellow wires below.
Twelve spaces in a row, with a coloured background, makes a thick coloured bar. Two rows of the same colour make it look solid. That’s how you draw shapes on the Spectrum — coloured spaces, placed precisely.
The Wire Labels
Lines 32-38 print the numbers 1-4 to the left of each wire. Each number uses INK matching the wire’s colour and BRIGHT 1 to stand out against the black background. The numbers sit at column 2, slightly left of the wires at column 5 — a gap that makes them easy to read.
The row numbers follow a pattern: 13, 15, 17, 19. Each wire starts two rows after the previous one. The labels sit on the first row of each wire.
The Screen as a Canvas
You’re not scrolling text any more. You’re painting a picture. The Spectrum’s 32x22 grid is a canvas, and PRINT AT is your brush. Every game screen is built this way — place coloured blocks and text at exact coordinates until the screen looks right.
The game screen now has three layers: the header bar (row 0), empty space for the countdown digit and fuse (rows 2-11), and the wires (rows 13-20). Each layer fills a specific region of the grid. The layout is deliberate.
Try This
- Change the wire colours. Try
PAPER 3(magenta),PAPER 5(cyan), orPAPER 7(white). Remember to change theINKon the labels to match. - Make the wires wider. Change
" "(twelve spaces) to" "(twenty spaces). The bars stretch further across the screen. - Add a fifth wire at rows 21-22 — but row 21 is the last printable row. Can you fit a one-row wire there?
What You’ve Learnt
- Coloured blocks — a space with a PAPER colour is a coloured square; a row of them makes a bar
- Two-row bars — drawing the same colour at consecutive rows creates a thick, solid shape
- Screen layout — the game screen is divided into regions: header, play area, wires
- Labels with matching colours — INK matches the wire’s PAPER colour so the numbers feel connected