Print and the Screen
Your first program put one line of text near the top-left and left it at that. Now you take charge of the screen: clear it to a colour of your choosing, and place text exactly where you want it with Locate. Two small commands, and the whole screen becomes yours to arrange.
Last time, Print dropped your text near the top-left corner and that was that. But a screen is a grid, and you get to say which square your text lands in. Two commands give you that control: Cls wipes the screen to a colour, and Locate moves the spot where the next Print will appear. Together they turn Print from "text falls where it falls" into "text goes where I say."
What you'll see by the end
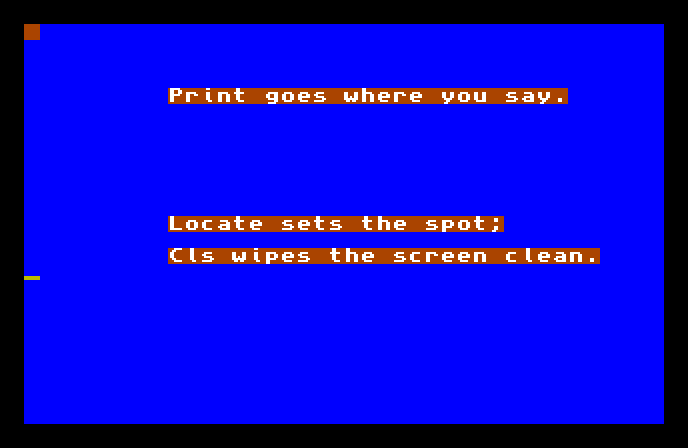
The screen is blue because you cleared it that way, and the three lines sit where you put them — not stacked tight at the top, but spaced out down the screen. (The orange behind each line is just AMOS's standard backing for text; you'll learn to change it when we reach colour.)
The whole program
Hide
Cls 6
Locate 9,4
Print "Print goes where you say."
Locate 9,12
Print "Locate sets the spot;"
Locate 9,14
Print "Cls wipes the screen clean."
Wait Key
Two new commands are doing all the work:
Cls 6clears the screen — Cls is short for "clear screen" — and the6says which colour to clear it to. AMOS starts with a small set of colours numbered from 0; number 6 happens to be blue. Leave the number off (Clson its own) and it clears to the default backdrop instead.Locate 9,12moves the text cursor — the invisible spot where the nextPrintwill land. The two numbers are a column and a row: 9 columns across, 12 rows down. Nothing appears yet; you're just aiming. The nextPrintthen fires from that spot.
So the pattern is aim, then print: Locate sets the position, Print puts text there. Each Locate/Print pair places one line exactly where you chose.
Columns and rows
The screen is measured in character cells — a grid of slots, each holding one letter. Locate 9,4 means "9 cells from the left, 4 cells down." Columns count across, rows count down, and both start at 0 in the top-left corner. Larger first number, further right; larger second number, further down.
You don't have to memorise the grid's size. Start with small numbers, run the program, and nudge them until the text sits where you want it — that try-and-see loop is the fastest way to get a feel for the screen.
Type it and run it
Type the program into the editor and press F1. The screen clears to blue and your three lines appear at the heights you set. Press a key to return to the editor.
Try this: move a line
Change the 12 in Locate 9,12 to 18 and run it again. That middle line jumps further down the screen, while the others stay put — proof that each Locate controls only the Print that follows it.
Try this: a different colour
Change Cls 6 to Cls 4 and run it. The background changes — AMOS's colour 4 is a different shade from 6. Try a few numbers from 0 to 15 and see what the starting palette gives you. (Choosing your own colours comes later; for now you're picking from the ones AMOS sets up for you.)
If it doesn't work
- The text is all bunched at the top. A
Locateis missing or misspelt, soPrintfalls back to its default spot. Each line needs its ownLocateabove it. - AMOS complains about
Locate. Check you've got two numbers with a comma between them —Locate 9,12, notLocate 9orLocate 9 12. - The screen doesn't change colour.
Clsneeds to come before the text, near the top — it clears everything, so anything printed before it would be wiped away.
What you've learnt
You took charge of the screen. Cls clears it — optionally to a numbered colour — and Locate column,row moves the text cursor so the next Print lands exactly where you aim it. The screen is a grid of character cells counted from the top-left, and aim-then-print is the rhythm for placing text anywhere on it.
What's next
You've been printing words you typed straight into the program. Next — Variables and Types — you'll give values names, so the program can hold on to a score, a player's name, or anything else, and print that instead of fixed text.