The Screen Is a Grid
Place text anywhere with PRINT AT. The Spectrum's screen is a grid 32 columns wide and 24 rows tall, addressed from the top-left — so you can put a label in a corner, the centre, or wherever the layout needs it. The title card finds its spot.
So far text has landed wherever the last PRINT left off. Now you take charge of where.
The Spectrum's screen is a grid — 32 columns across, 24 rows down — and PRINT AT
puts text at any cell you name.
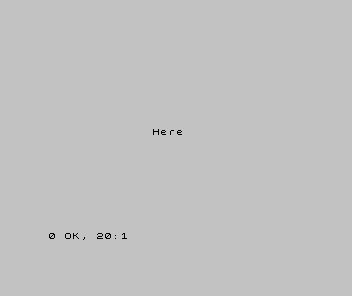
Milestone 1 — place a word
  10 CLS
  20 PRINT AT 10, 13; "Here"
PRINT AT 10, 13; "Here" prints at row 10, column 13 — roughly the middle. The order
is row first, then column (down, then across), and both count from 0 at the
top-left.
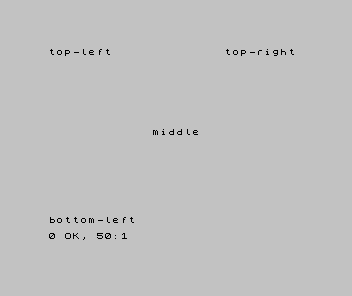
Milestone 2 — address the whole grid
Give the corners and the centre their own PRINT ATs and the grid comes into focus:
| 1 | 1 | 10 CLS | |
| 2 | - | 20 PRINT AT 10, 13; "Here" | |
| 2 | + | 20 PRINT AT 0, 0; "top-left" | |
| 3 | + | 30 PRINT AT 0, 22; "top-right" | |
| 4 | + | 40 PRINT AT 21, 0; "bottom-left" | |
| 5 | + | 50 PRINT AT 10, 13; "middle" | |
| 3 | 6 | |
Row 0 is the top, row 21 near the bottom (the lowest two rows are kept for the input area), column 0 the left edge, column 31 the right. Each label lands exactly where its numbers put it.
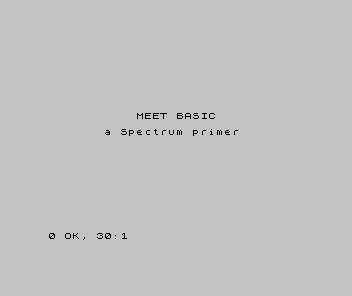
Milestone 3 — the title card finds its spot
Back to the title card. In Unit 3 it printed from the top-left; now you can place it where you want — centred, like a real game's opening screen:
  10 CLS
  20 PRINT AT 8, 11; "MEET BASIC"
  30 PRINT AT 10, 7; "a Spectrum primer"
To centre a line, leave equal space each side: MEET BASIC is 10 characters, so starting
at column 11 leaves 11 columns either side of the 32.
When it doesn't work
- The text landed in the wrong place.
ATis row, then column —AT 10, 13is row 10, column 13, not the other way round. A common slip. Integer out of range. A row above 21 or a column above 31 is off the grid. Keep rows 0–21 and columns 0–31.- It printed at the top-left anyway. Check the punctuation:
PRINT AT row, col;— a semicolon after the position, before the text.
Before and after
You started with text landing wherever the last PRINT left off and finished placing
it anywhere on a 32-by-24 grid — corners, centre, a centred title. The idea underneath:
PRINT AT row, column addresses the screen as a grid, counting from 0 at the
top-left.
Try this
- Centre your name. Work out the column that centres it and place it mid-screen.
- A border of dots. Use a
FORloop andPRINT ATto run a row of dots along the top. - Stack a menu. Place three options at rows 8, 10 and 12, all at the same column.
What you've learnt
- The screen is a grid: 32 columns, 24 rows, addressed from 0 at the top-left.
PRINT AT row, column; "text"places text exactly — row first, then column.- The print area is rows 0–21; the lowest two rows are the input area.
- Centre a line by leaving equal columns on each side.
What's next
The title card has a place — but it's still grey on grey. In Unit 10 we bring colour:
INK, PAPER, BORDER, and a loop that paints the title in every colour at once.